Roast Veg Lasagne

It has been far too long since I posted a recipe, so to rectify this somewhat I’m starting the new year (I might even be too late to reference new year) with this healthy recipe. Just like everyone else I am focusing on healthy, but tasty, recipes. This lasagne is missing the creaminess of your standard lasagne, and there is no cheese I’m afraid. It does however fill you up, have rich flavours and is good simple food. Enjoy

img_0696

What:

  • 2 large courgettes
  • 6 large round tomatoes
  • 4 peppers (yellow and red work best)
  • 3 garlic cloves
  • Calorie controlled spray/olive oil
  • 1 jar of passata
  • 1 tin of chopped tomatoes
  • 4 fresh lasagne sheets
  • 1 tablespoon Quark (cheese does sneak into this recipe, sort of). Philadelphia or a soft cheese can be used instead, or left out altogether
  • Dried herbs (Mixed Italian herbs/basil/oregano/rosemary)
  • Salt & Pepper

How:

  • Chop the courgettes, peppers and tomatoes into large chunks
  • Place in your baking dish, spray with calorie controlled spray/drizzle 1 tablespoon of olive oil over the veg and season with salt & pepper
  • Roast in the oven at 180 for around 40 mins
  • Place the tinned tomatoes and passata in a pot and gently heat, adding your crushed garlic cloves, salt & pepper and herbs
  • Take off the heat and stir in Quark/soft cheese (This step can be left out if you choose not to use a cheese)
  • When the veg are roasted, remove half from the dish and set aside. With the veg that remain in the dish place two lasagne sheets over the top, and pour half of your tomato sauce over the top.
  • Place the remaining veg on top, followed by two lasagne sheets, and the remainder of your tomato sauce
  • Ensure that the top layer of lasagne sheets are totally covered in the tomato sauce, as they will harden as the dish cooks. If there is not enough sauce to cover this, cover the dish with tinfoil
  • Bake in the oven at 180 for around 40 minutes.


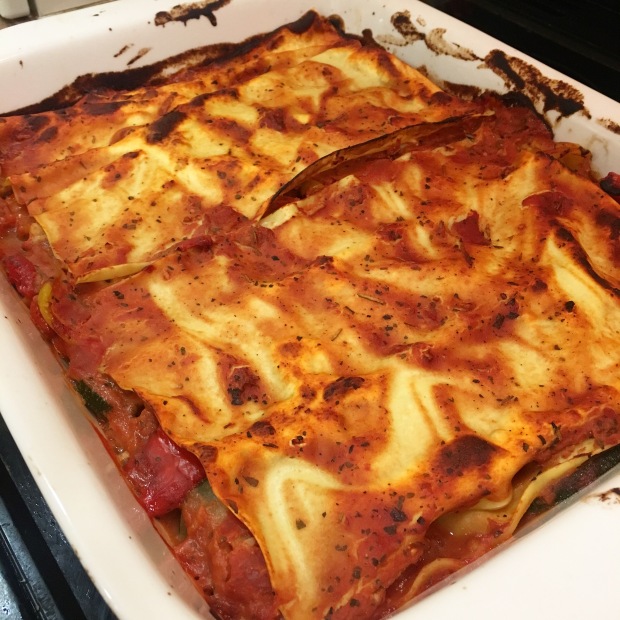
This is a really simple recipe, very little goes into it and the real work is done in roasting the veg. That’s where all the flavour comes from. This might be more like a ratatouille with the addition of some pasta, and not strictly a lasagne. It is however cheap, tasty and healthy. This is a bit of a loose recipe, if you have more veg to use up or some in the fridge that isn’t listed above, throw it in. It’s hard to find a vegetable that doesn’t taste better after a while in the oven. This can be kept in the fridge for a few days, once it’s properly cooled, or frozen. It’s also the type of dish that tastes better after a day or two when the flavours develop even more.


If you make this make sure to show me on instagram with #studentfoodbible

Chicken & Broccoli Bake

It’s been quite a while since my last recipe post, apologies for the hiatus! The last few weeks have been quite busy, I’ve moved back home after 4 years in Glasgow and started studying medicine! Uni is busy, I’m travelling 80 miles most days(!) and it’s taken longer than expected to fall into a good routine. I”m finally getting there, which means more cooking and more recipe posts. So here we go

Last week I saw on facebook that Mash Direct were running a competition to make anything you wanted, as long as it included one of their products. Chicken and Broccoli bake with Mash Direct champ on top was my entry, and turned out to be one of my most popular instagram posts. This makes 3 generous portions, serve up with some veg for a perfectly healthy dinner.

img_0201-2


img_0225

What:

  • 1 large chicken breast, diced into chunks
  • Broccoli (fresh or frozen, frozen being great value)
  • 200g mushrooms chopped
  • 200ml coconut milk
  • 1 melting chicken stock pot
  • Salt & Pepper
  • 3 cloves of garlic, crushed
  • Mash Direct Champ
  • Fry light
img_0176

All your ingredients!

How:

  • Preheat oven to 180 degrees
  • Cut the chicken into chunks, chop mushrooms, and crush the garlic
  • Brown the chicken in a large frying pan, first spraying the pan with Fry Light
  • Season the chicken with salt & pepper, adding the garlic after a few minutes so it doesn’t burn. Cook the chicken for 10 minutes, it just needs to be sealed as it will be going into the oven later
  • Steam or boil the broccoli for 8-10 minutes – This process is the same whether you choose to use frozen or fresh, just break into smaller pieces first
  • Cook the mushrooms in a deep pot, a large soup pot is best, on a low heat, stirring occasionally . Be generous adding ground black pepper, 2-3 teaspoons at least
img_0178

Mushrooms cooking with black pepper

  • When the mushrooms have cooked down and appear soft and brown, add in the melting chicken stock pot and 200ml coconut milk, stirring everything together. Bring to a boil and then remove from the heat
img_0182

Add chicken stock pot and coconut milk to the mushrooms

  • Blend the mushrooms and coconut milk mixture until it is smooth
  • Place the chicken and broccoli into an oven proof dish, pour over the mushroom sauce and then top with the champ
  • The champ is normally cooked in the microwave, I put it in the microwave for 3 minutes to soften it to be able to spread it over the top of the bake
img_0183

Place the chicken and broccoli into an oven proof dish

img_0184

img_0200

Spread the champ on top, cover in tinfoil and into the oven

  • Cover with tinfoil and bake in the oven for 20 minutes
  • Remove tinfoil and cook for a further 5 minutes to crisp up the top

img_0201-2

img_0226

This dish can be made without a top at all, or a breadcrumb top, the choice is yours. I made this exact same dish last week with a breadcrumb top instead. Just blend 3-4 slices of any bread you have that’s beginning to go a little stale

img_0145-2


This is a perfect dish to pack veg into, and to batch cook as it will keep in the fridge for 2 days. If you make this make sure to show me on instagram with #studentfoodbible


Rosemary & Garlic Hasselback Potatoes

This is a simple recipe that produces a dish that looks much more impressive than you would think. A tasty side suitable for any dish, why not give this one a go. The garlic butter part of the recipe below should make enough to cover around 8 new potatoes.

IMG_5198

What:

  • New potatoes (2-3 per person as a side)
  • 2 tablespoons butter
  • 3-4 cloves of garlic minced
  • 2 teaspoons dried rosemary
  • Salt & Pepper

How:

  • Preheat an oven to gas mark 6/180 degrees
  • Rinse the potatoes under cold water, scrubbing off any soil there may still be on them
  • Place the each potato in a wooden spoon to cut, you want to cut the potato into thin slices along its length, without cutting right through. By cutting the potatoes when they are sitting in the spoon, the knife will hit the spoon before the end of the potato, ensuring that the potato stays wholeIMG_5150
  • Mix the butter, garlic and rosemary together and spread over the top of the cut potatoes, fanning the slices out and spreading the butter between the slicesIMG_5152
  • Cover an oven tray with tinfoil, place the potatoes in with the butter side up, season with salt & Pepper, and cover completely with the tinfoil
  • Cook for around 45-50 minutes covered
  • Cook for a further 10 minutes uncovered, allowing the potatoes to crisp


If you make this make sure to show me on instagram with #studentfoodbible

Leek & Celery Soup

When vegetables are starting to look a little worse for wear, and are in the reduced aisle in supermarkets there’s only one thing to do with them, make soup. I spotted celery for 17p last night which I couldn’t resist. Making your own soup is one of the cheapest meals you can make, packed full of veg and easy to freeze. Soup is the ultimate cheap eat for the savvy student. A large pot makes making soup a lot easier, and is versatile for many other dishes too,  this one from ikea ticks all the boxes.

IMG_5109

I chose to add in a bag of soffrito, which is just a vegetable base for soup consisting of red onion, carrot and celery. You could just as easily make this yourself with one red onion and one carrot chopped, forgoing the celery as there’s plenty already going in. Try to buy vegetables loose, the price per kg is almost always cheaper and you don’t buy more than you need to. It tends to be larger supermarkets that offer a wider range of loose vegetables, or independent fruit & veg shops.

What:

  • Celery – About 8-10 stalks chopped
  • 2 medium leeks chopped
  • 1 packet soup veg mix/soffrito
  • 800ml of Bouillon Vegetable Stock (or any vegetable stock cubes)
  • 250ml boiling water
  • Salt & Pepper
  • 2 tablespoons Olive oil

IMG_5110IMG_5113

How: 

  • Chop the veg and rinse through a colander under cold water
  • Pour the olive oil into the soup pot on a gentle heat
  • Add the soffrito/soup base and gently stir occasionally, seasoning with salt & pepper
  • Next add in the chopped leeks and celery, allowing to cook down and soften for about 10 minutes
  • Prepare the Bouillon stock and add to the pot, along with the boiling water
  • Set the lid on and let the vegetables cook gently for a further 15-20 minutes
  • You can leave it at this point if you like a chunky vegetable soup, otherwise take off the heat and use a stick blender
  • This part is down to personal preference, the longer you blend for the fewer chunks there will be

IMG_5116

This recipe makes for a fairly thick soup. It’s safer to err on the side of caution at first, adding in more water to make a thinner, or runnier soup. Soup can be frozen easily in tupperware, defrosting quickly when desired. You can extend the quantity of the soup after some has been eaten by adding more water with a little stock to maintain the flavour. You can also throw in whatever vegetables you have at the back of the fridge, nothing takes care of them better than a soup.

Mushroom & Tarragon Chicken

Having just landed back from Italy and with only a few hours before I had to be in work, I did a supermarket sweep style dash around the shops to pick up a few pieces to throw a packed lunch together. After two weeks enjoying the most delicious food in Italy, I couldn’t bear to have an overpriced ready meal in work, resulting in this Mushroom & Tarragon Chicken. This is a bit of a bare bones recipe which you can easily adapt to your own taste with some different veg or sides. Make enough for 4 portions and keep it in the fridge, or put some in the freezer for when you too are tight for time.

IMG_4816

The packed lunch version with microwave wholegrain rice & quinoa


Ingredients: 

  • 3 cloves of garlic chopped
  • 5-6 Chestnut mushrooms roughly chopped
  • 450-500g chicken breast (the smaller it’s cut, the quicker it will cook)
  • 10 cherry tomatoes, halved
  • 3 spring onions chopped
  • 2 teaspoons of dried tarragon
  • 2 tablespoons olive oil
  • salt and ground black pepper – Granny’s Spice Salt from Tiger is a gamechanger
  • 3 tablespoons of Creme Fraiche
  • Rice, pasta, or quinoa to serve. This one’s up to you


How: 

  • Peel and chop the garlic, chop the mushrooms, tomatoes and spring onions. Keep a few spring onions to the side to garnish at the end
  • On a different chopping board cut the chicken breast into small chunks
  • Heat the oil on a low heat in a frying pan
  • Add the chicken to the frying pan, seasoning with salt and pepper and dried tarragon
  • Stir occasionally, letting the chicken brown on a medium heat. After a few minutes add the garlic, mushroom, spring onion, and tomatoes. Adding garlic in a little later than at the start of cooking stops the garlic from burning and brings out the flavour in a much nicer way
  • Let the ingredients cook together for about 10-12 minutes. Some water will be released from the tomatoes and chicken, let this reduce until there’s just a little water remaining in the pan
  • Reduce to the lowest heat, add 2 teaspoons of ground black pepper and stir through the creme fraiche
  • Serve alone or with rice, pasta or quinoa, or anything you fancy, and sprinkle the remaining spring onions on the top
photo (4)

Presentation with a little more time

You could add peas, leeks, broccoli, spinach or some peppers into this dish. I would have added some extra veg into this had I had any! Hopefully you enjoy this recipe as much as I did. If you make this make sure to show me on instagram with #studentfoodbible

Prawn Linguine


After trying the M&S Prawn Linguine, and being truly impressed with the flavour, I wanted to see if I could recreate or even better the dish myself. I was so pleased with how this experimental recipe turned out that it only seemed fitting to have it as the first recipe on the blog. This is an easy dish to prepare, looks impressive and tastes delicious. The recipe makes a generous 3 portions, simply increase the ingredients for more leftovers, and what’s even better is this can be kept in the fridge for a few days.

IMG_4008 (1)

Ingredients: 

  • 16 Raw Tiger Prawns (You can use already cooked prawns too)
  • 200g Linguine
  • 2 Shallots finely diced
  • 3-4 Cloves of Garlic crushed
  • 6 Chestnut Mushrooms diced
  • 65g Sundried Tomatoes
  • 100g frozen peas
  • 1 red chilli diced (remove seeds for less heat)
  • 3 tablespoons of Creme Fraiche
  • Salt & Pepper to season
  • Herb Butter/Garlic butter 25g  (These can be bought, or you can add garlic or chopped herbs to butter making your own, or just plain butter)
  • 2 Tablespoons of fresh chopped Chives
  • 5-6 Basil leaves finely chopped
  • 1 Tablespoon Olive Oil


How:

  1. This recipe is made easier if everything is chopped beforehand. So, finely dice the shallots, garlic, mushrooms and chilli first. Chop the basil and chives and leave to the side until the end
  2. Add the linguine to a pot of boiling water, add a sprinkle of salt. Boil the linguine for a total of 10-12 minutes
  3. Drizzle the olive oil to a frying pan and add the shallot, cook on a gentle heat
  4. After 30 seconds add the raw prawns*
  5. After 1-2 minutes, when the prawns start to turn pink and curl up, add the mushroom and garlic
  6. Add peas to the linguine to boil together (saves on washing up and pots when they’re at a premium)
  7. Add half the chilli, herb/garlic butter and sundried tomatoes to the prawns. Occassionally stirring gently
  8. Drain the linguine and peas, add to the prawns and reduce to a low heat
  9. Add the creme fraiche and stir through, combining all the ingredients
  10. Increase the heat for the final 30 seconds
  11. Add the remaining half of the chilli, chopped chives and basil
  12. Serve, season with salt & pepper and enjoy!

*If you use already cooked prawns add them at step 7

Hopefully you enjoy this recipe as much as I did. If you make this make sure to show me on instagram with #studentfoodbible